Do you need to install Windows 11 using a local account or without TPM or Secure Boot ?
Microsoft’s latest Windows 11 update is forcing users to create a Microsoft account and blocking users from creating a local account.
They are also forcing Secure Boot with TPM chips which is causing a lot of upset amongst users for so many reasons.
Many users are now looking at Linux as an alternative, especially for work and general web browsing. If they ever do block all bypass methods, then I think a lot of people will jump ship to a different operating system.
Stronger restrictions started in October 2025 with Windows 25H2 release.
Speculation from reputable sources say that having users sign in during the installation process, creates a permanent device ID (hardware identifiers) bond between your PC and Microsoft’s user/device master database along with the decryption keys which can be very bad for privacy/security.
Rob Braxman has a good video explaining some of these concerns: https://www.youtube.com/watch?v=t1eX_vvAlUc
This video talks about the TPM 2.0 chip, a requirement for Windows 11, as a surveillance tool rather than just a security feature. He claims that through features like BitLocker, Microsoft forces users to permanently link their computer’s unique hardware ID (Endorsement Key) to their Microsoft account [03:37]. The video alleges this allows Microsoft to route all security operations through its cloud [05:31] and use “remote attestation” to verify your hardware and software, potentially blocking other operating systems like Linux [10:04]. Rob concludes this system, combined with AI (Copilot) like Windows Recall [11:44], creates a “kill chain” to monitor user behavior and control their computers [13:52].
Old local account bypass that used to work are:
(See further below for new method)
OOBE\BYPASSNRO: This was a command-line trick and it is important you don’t allow your PC to connect via network cable or WiFi. You could pressShift+F10to open a command prompt during setup at the point where you enter your network details, type theOOBE\BYPASSNROcommand, and the PC would restart, allowing you to click “I don’t have internet,” which would then let you create a local account. This is being blocked.start ms-cxh:localonly: This is/was another command-line trick that would directly open the “create a local account” screen. Typically you would install and actually go online with this one. Then at the ‘Sign In’ or ‘Lets add your Microsoft Account’ screen, you would pressShift+F10(orShift+Fn+F10on some laptops) to get command prompt. Then typestart ms-cxh:localonlyto allow a local account creation. But this is also being blocked.- Using fake email addresses: Entering a blocked or non-existent Microsoft email (like
no@thankyou.com) would sometimes fail the check and allow you to create a local account. This method is also being phased out.
So what is the latest new method to bypass Windows 11 install restrictions?
Here is a detailed, step-by-step guide on how to use the Rufus tool to create a Windows 11 installation USB, specifically using the option to bypass the Microsoft account requirement.
What This Process Does
You will use a free, third-party tool called Rufus to create a bootable USB drive. During this process, Rufus will offer to “patch” the Windows 11 installation files. This patch automatically modifies the setup process so it no longer forces you to use a Microsoft account, allowing you to create a local account from the start, just like in older versions of Windows.
Prerequisites: What You Will Need
- Rufus: A free, small application. You can find its official website by searching for “Rufus official download.” Download the standard “Portable” version, which doesn’t require installation.
- A Windows 11 ISO File: This is the official installation image for Windows 11. You can download this for free directly from Microsoft. Search for “Download Windows 11 ISO” to find the official “Download Windows 11 Disk Image (ISO)” page from Microsoft.
- A USB Flash Drive: It should be 8GB or larger.
- Warning: This process will completely erase everything on the USB drive. Make sure you have backed up any important files from it.
Step-by-Step Guide to Bypassing Windows 11 Installation Restrictions:
Step 1: Download the Required Files
- Download the Windows 11 ISO from Microsoft’s official website. Save it to a location you can easily find, like your Desktop or Downloads folder.
- Download the Rufus application from its official website.
Step 2: Configure Rufus
- Plug your 8GB (or larger) USB drive into your computer.
- Open the Rufus application you downloaded (it’s a
.exefile). It will ask for administrator permission; click Yes. - The Rufus window will open. Configure the following settings in order:
- Device: At the very top, select your USB flash drive from the dropdown menu. If it’s the only one plugged in, it will likely be selected automatically. (Double-check this to avoid erasing the wrong drive!)
- Boot selection: Click the “SELECT” button. A file explorer window will open. Navigate to and select the Windows 11 ISO file you downloaded in Step 1.
- Image option: Leave this set to “Standard Windows Installation”.
- Partition scheme: For most modern computers (made in the last ~10 years), you will leave this as “GPT”.
- Target system: This will usually auto-set to “UEFI (non CSM)”. This is correct for GPT.
- Volume label: You can rename this to something like “Windows 11” (this is optional).
- Leave all other options (File system, Cluster size) as their defaults.
Your Rufus window should look similar to this:
Device:         [Your USB Drive (e.g., 16 GB)]
Boot selection: [Your Windows 11 ISO file name]
Image option:   Standard Windows Installation
Partition scheme: GPT
Target system:  UEFI (non CSM)
...
[Ready]
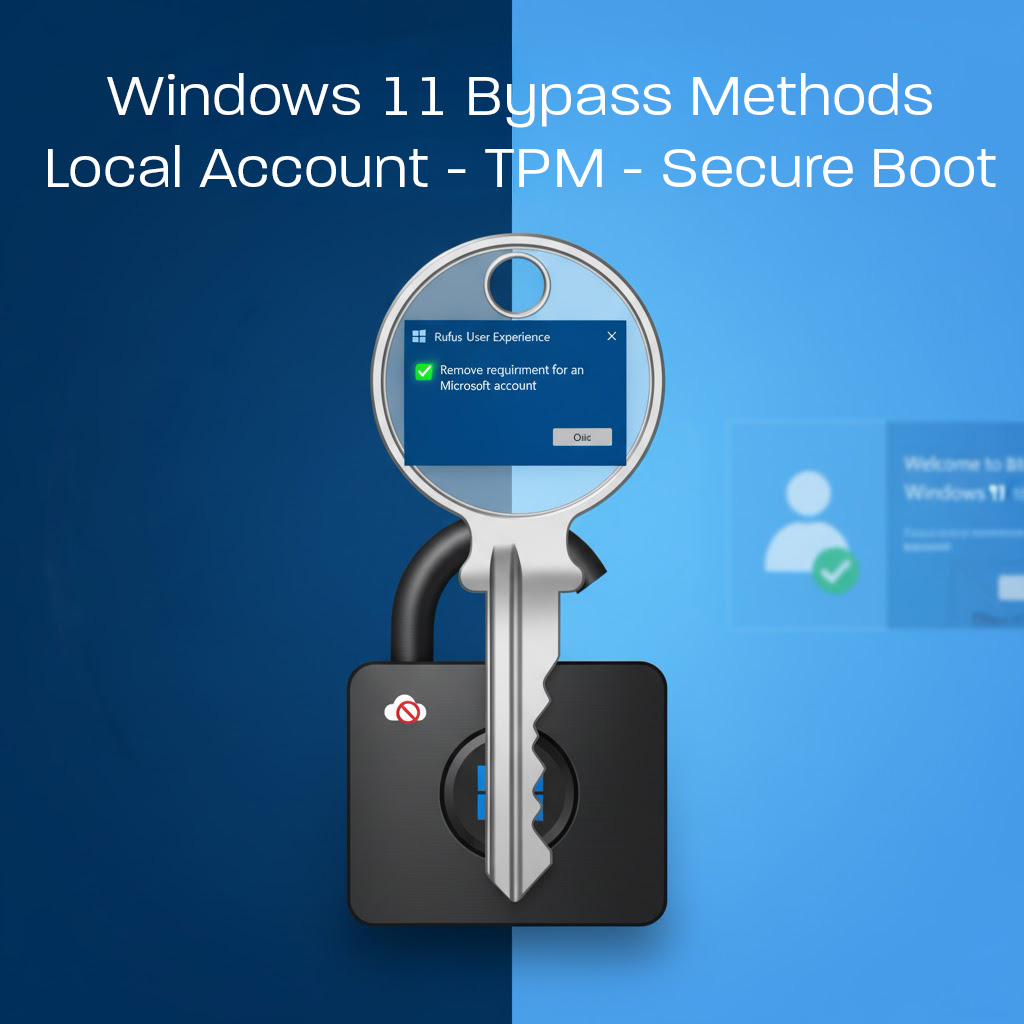
Step 3: The “Windows User Experience” Customization (The Key Part)
- Click the “START” button at the bottom of the Rufus window.
- STOP! A new pop-up window will immediately appear, titled “Windows User Experience“. This is the most important step for your request.
- This window gives you several customization options. The one you are interested in is at the top:[✔] Remove requirement for an online Microsoft accountMake sure this box is checked.
- Other Useful Options in This Box:
Create a local account with username:You can be even more direct. If you check this box, you can type in a username (e.g., “Admin”, “MyName”) and Rufus will configure the installer to automatically create a local account with that name, skipping the “Who’s going to use this PC?” screen entirely. If you use this, you can set a password for the account later within Windows.Remove requirement for 4GB+ RAM, Secure Boot and TPM 2.0: This is an extremely useful option if you are installing Windows 11 on a computer that is “unsupported” and doesn’t meet Microsoft’s strict hardware requirements.Disable data collection (Skip privacy questions): This automatically checks “no” to all the privacy-intruding questions during the final phase of setup.Disable BitLocker automatic device encryption: Stops Windows 11 Home/Pro from automatically encrypting your main drive, which some users prefer for performance or data recovery reasons.
- Select all the options you want (especially the “Remove requirement for an online Microsoft account” one) and click “OK”.
Step 4: Create the Drive
- After you click “OK” on the customization box, Rufus will show you one final warning that all data on the USB drive will be destroyed.
- Click “OK” to confirm.
- Rufus will now begin creating the USB drive. You will see a green progress bar. This process can take anywhere from 5 to 20 minutes, depending on the speed of your USB drive and computer.
- When it is finished, the progress bar will be full and the status will say “READY” in all-caps.
You can now close Rufus. Your bootable Windows 11 USB drive is ready.
What to Do Next
- Take the new USB drive to the computer you want to install Windows 11 on.
- Boot the computer from the USB drive (you may need to press a key like F12, F10, F2, or Del during startup to enter the Boot Menu or BIOS settings).
- Proceed with the Windows 11 installation.
- Because of the modification Rufus made, when you get to the “Let’s connect you to a network” screen, there will be a new option to click “I don’t have internet”. On the next screen, you will be able to click “Continue with limited setup”, which will take you directly to the classic “Create a Local Account” screen.
One Final Alternative Method:
The Registry Edit (LabConfig) Method (For Clean Installs)
It’s a “manual” method for users who don’t want to download or use a third-party tool like Rufus.
- How it works: During the initial Windows 11 setup (when booting from a standard, unmodified USB), the user presses
Shift + F10to open a Command Prompt. - They then use
regeditto create a new key:HKEY_LOCAL_MACHINE\SYSTEM\Setup\LabConfig. - Inside this key, they create new DWORD values like
BypassTPMCheck,BypassSecureBootCheck, andBypassRAMCheckand set their data to1. - Why it’s useful: This directly tells the installer to skip the hardware checks and is a very common method for tech-savvy users who prefer to do things themselves.
PS: It would also be a good idea to keep an older Windows 11 boot USB prior to this new restriction and install it offline.
Here is an app worth mentioning. It “Uses Windows Server variant of setup → skips TPM, Secure Boot, CPU checks
Still and installs normal Windows 11″ : https://github.com/builtbybel/FlyOOBE
Good luck! This might be the beginning of the end for Microsoft…