How to Connect UniFi Protect Cameras to a Remote UNVR Across Different Site Locations
Did you know its possible to connect a UniFi Protect Camera at one location to a completely different location, on a different internet connection, including via Starlink or Mobile 4G/5G, to allow recording at the original site? Think remote sites with no infrastructure, cars, towers, security huts or even holiday homes.
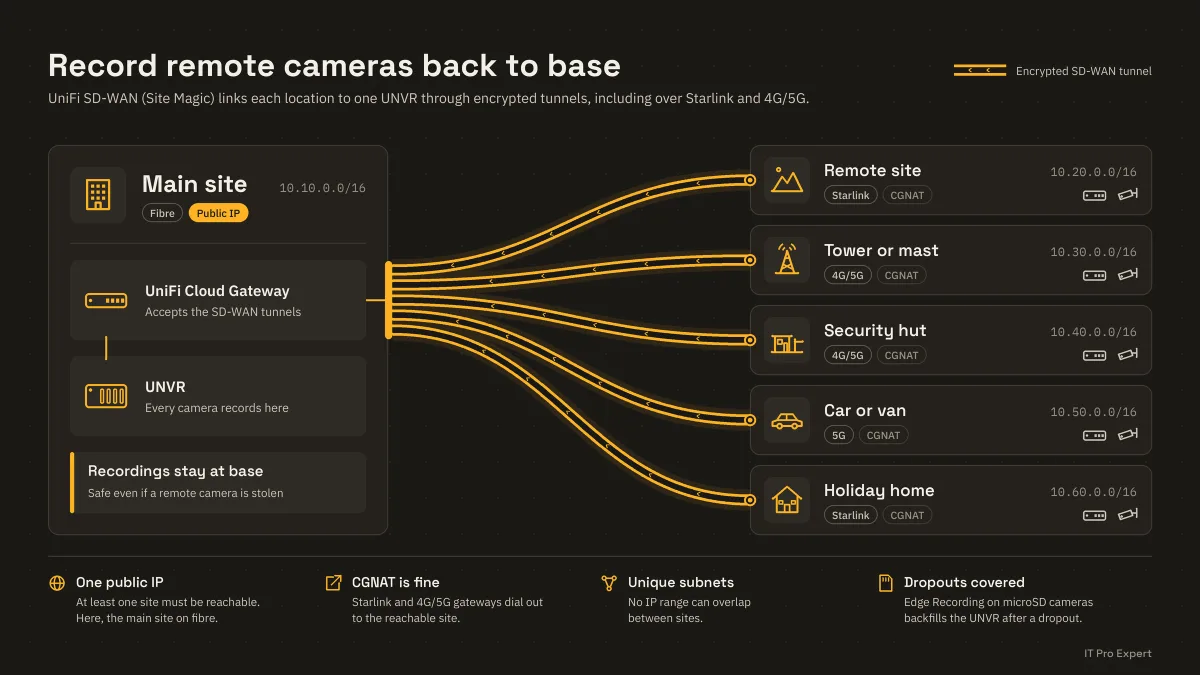
Did you know a UniFi Protect camera at one location can record to a UNVR at a completely different location, on a different internet connection, including Starlink or mobile 4G/5G? The recordings stay at your original site, wherever the camera happens to be.
Cameras where there's no infrastructure
That opens up places that would otherwise need their own recorder, or no cameras at all. Wherever you can provide power, a UniFi gateway and an internet connection, a camera can record back to base. Think:
Remote sites and towers
No fixed line needed. Starlink or 4G/5G carries the video back to your main recorder.
Cars and vehicles
With power, a gateway and mobile data on board, a vehicle camera can record back to base.
Security huts
Recordings live at the main site, so they're safe even if the hut is broken into.
Holiday homes
Keep watch over a second property using the UNVR you already have at home.
On Starlink, the gateway connects to the Starlink router in bypass mode. For 4G/5G, Ubiquiti's UniFi 5G Max can plug into a gateway's WAN port as the primary internet connection. The rest of this guide follows one common pairing, a fibre site and a Starlink site, but the same principles apply to every location you add.
Why a remote camera can't find the UNVR on its own
On a single site, adoption is close to automatic because the camera and the recorder discover each other using local broadcast traffic. That traffic never leaves the local network. Put the camera at another location and it sits on a different network, behind a different internet connection, with no route back to the UNVR.
Opening the recorder's ports to the internet is the wrong fix: it exposes your CCTV system to anyone scanning for it. The secure approach is a site-to-site VPN, an encrypted tunnel that joins the networks so the camera reaches the UNVR on its private IP address, just as it would if the recorder were in the next room.
How UniFi SD-WAN (Site Magic) connects the sites
Site Magic appears as SD-WAN in current versions of UniFi Site Manager. Instead of building a VPN by hand at each end (matching settings, exchanging keys, writing static routes twice), you choose the sites and the networks each one should share. The gateways then build and maintain encrypted WireGuard tunnels between themselves.
There are two layouts. Mesh links every site directly to every other and supports up to 20 sites. Hub & Spoke routes branch sites through a central hub, scales to 1,000 tunnels and can translate overlapping subnets, but the hub has to be a higher-end gateway such as a UDM Pro, UDM SE, UDM Pro Max or UCG Fiber. For a main site and a handful of remote locations, Mesh is the straightforward choice and the one this guide uses. Four things need to be in place first:
- One account owner. Every gateway in a Mesh must have the same UI account owner, and only the owner can manage SD-WAN.
- One public IP. At least one gateway needs a publicly reachable IP address. The others can sit behind CGNAT.
- Unique subnets. Mesh can't translate addresses, so no network at one site may overlap with a network at another.
- A supported gateway at every location. UniFi Cloud Gateways and Dream Machines can join a Mesh; legacy USGs can't. Update them all before you start.
Starlink, 4G/5G and fibre: CGNAT on one side is fine
Standard Starlink service uses carrier-grade NAT (CGNAT), and most mobile networks do the same. Your gateway gets a private address (on Starlink, from the 100.64.0.0/10 range), the provider translates it to a shared public address upstream, and nothing on the internet can open a connection into your site. That rules out port forwarding, along with any VPN that expects both ends to accept incoming connections.
SD-WAN only needs one reachable gateway. Pair a Starlink or 4G/5G location with a site that has a public IP and the CGNAT gateway simply connects out to it. Once the tunnel is up, traffic flows in both directions. Ubiquiti also confirms that SD-WAN picks up WAN IP changes automatically, including on gateways behind NAT, so changing Starlink or mobile addresses won't break the link.
It works either way round. The recorder can sit on fibre with cameras out on Starlink or 4G/5G, or, as in the worked example below, the UNVR can be at a Starlink site with the extra camera on fibre. The public IP requirement is about which gateway can accept the tunnel, not where the footage is stored. What won't work is two CGNAT connections on their own, such as a recorder on Starlink and a camera on 4G.
Plan the IP addressing on every site first
Sort this out before you go anywhere near the SD-WAN settings. A Mesh routes traffic purely by destination address. If two sites both use 192.168.1.0/24, neither gateway can tell whether 192.168.1.50 is on its own network or at the other site, which is why overlapping networks can't share a Mesh group.
Default settings are the usual cause. The 192.168.0.x and 192.168.1.x ranges turn up on a great many routers, including Starlink's own, so sites set up out of the box can easily collide. Give each site its own block instead, such as 10.10.x.x for the first site, 10.20.x.x for the second and 10.30.x.x for the next, with a /24 for each network or VLAN. It's easy to read at a glance and scales as you add locations.
Fibre site (camera, public IP)
- Main network: 10.10.1.0/24, gateway 10.10.1.1
- Cameras VLAN: 10.10.20.0/24
- Remote camera: takes a DHCP address on the cameras VLAN
Starlink site (UNVR, CGNAT)
- Main network: 10.20.1.0/24, gateway 10.20.1.1
- Cameras VLAN: 10.20.20.0/24
- UNVR: fixed IP 10.20.20.10
A dedicated cameras VLAN is good practice rather than a requirement. The one rule you can't bend is that nothing overlaps.
Re-addressing a site that overlaps
If sites already clash, change the one with fewer devices, and do it before adopting anything across the tunnel. Ubiquiti's process keeps downtime to a minimum:
- Temporarily turn off Fixed IP Addresses on clients (filter Client Devices by Fixed IP Address to find them), and switch any UniFi devices or clients with static IPs back to DHCP.
- Reduce the network's DHCP lease time from 86400 to 60 seconds, then wait a day so every device picks up a short lease.
- Duplicate any firewall rules that reference the old range so they also cover the new one.
- In UniFi Network, go to Settings > Networks, open the network and change its Gateway IP/Subnet, for example from 192.168.1.1/24 to 10.10.1.1/24. Devices reconnect within about a minute; reboot any that don't.
- Set the lease time back to 86400 seconds and re-apply fixed or static IPs inside the new range.
Two checks before you enable SD-WAN
- Fix the UNVR's address. Give it a Fixed IP Address in UniFi Network. A remote camera remembers the recorder's IP, so if the UNVR's address changes, the camera drops offline.
- Remove double NAT. Put the Starlink router into bypass mode from the Starlink app so the Cloud Gateway takes the connection directly, which also takes the Starlink router's own 192.168.1.x network out of the picture. Turning bypass off again means factory-resetting the Starlink router. At the site with the public IP, the gateway should hold that address itself.
Create the SD-WAN mesh
The steps from here follow the worked example: a camera at the fibre site recording to the UNVR at the Starlink site. For extra locations, add each one to the same group and repeat the camera steps.
- Sign in to UniFi Site Manager at unifi.ui.com with the account that owns every gateway.
- Go to Settings > SD-WAN (shown as Site Magic on some versions).
- Choose Mesh and give the group a name.
- Add the sites, then select the networks each should share: at minimum, the cameras network at the fibre site and the UNVR's network at the Starlink site.
- Click Connect, then test from a device at the fibre site by pinging the UNVR's IP or opening it in a browser. Don't move on until that works.
In a Mesh, traffic flows directly between the sites and each site's own firewall rules decide what's allowed. Share only the networks that need to talk, and tighten the rules once the camera is recording.
Add the camera to the UNVR in UniFi Protect
Automatic discovery doesn't cross the tunnel, so the camera has to be told where the UNVR is. For cameras on a different network, Ubiquiti's method is to set the Protect host on the camera itself:
Reset the camera
If the camera has been adopted before, factory-reset it. A camera can only belong to one Protect console, so if the fibre site's gateway also runs Protect, don't adopt it there.
Find its IP address
Connect the camera at the fibre site and look up its address in that site's UniFi Network client list.
Sign in to the camera
Browse to the camera's IP from a computer at either site, as the tunnel makes it reachable from both. Sign in with the default credentials ui/ui (some cameras use ubnt/ubnt).
Point it at the UNVR
Enter the UNVR's IP address as the UniFi Protect host and save. The camera then reaches out to the recorder through the tunnel.
Adopt it in Protect
Open UniFi Protect on the UNVR and go to UniFi Devices, where the camera should be waiting for adoption. Adopt it, update its firmware and set up recording as you would for a local camera.
If the camera asks for an adoption token or never appears, adopt it locally instead. Take it to the Starlink site, plug it into the UNVR's network, adopt and update it there, then reinstall it at the fibre site. It keeps the UNVR's IP address and reconnects over the tunnel. Ubiquiti support has suggested this workaround, and it's the easiest route if the camera hasn't been installed yet.
Tips for reliable remote recording
Want it set up for you?
We plan and install UniFi networks and CCTV systems as part of our Ubiquiti services.