Cheat Sheets
IT cheat sheets
The commands, limits, codes and checklists we look up most — checked against vendor documentation and dated so you know how current they are. Search the lot, or jump to a section. For software, see the tools directory.
- —cheat sheets
- 5topic areas
- Aug 2026last verified
- UKfocused, vendor-sourced
Nothing matches that search. Try a shorter word — a command name, an error code, or a topic like "backup" or "wifi".
Windows
7 sheetsWindows repair commands — in the right orderWindows
The single most common support mistake is running SFC first. SFC repairs system files using the local component store — if that store is itself corrupt, SFC will fail or "fix" nothing. Repair the store with DISM first, then run SFC.
- Check the store — read-only, changes nothing.
DISM /Online /Cleanup-Image /ScanHealth - Repair the store — needs internet, or a known-good source.
DISM /Online /Cleanup-Image /RestoreHealth - Now repair system files.
sfc /scannow - Reboot, then re-run
sfc /scannowto confirm it reports no violations.
When DISM can't reach Windows Update
Mount a matching Windows ISO and point DISM at its install image. Change D: to your mounted drive letter and 1 to the correct edition index:
DISM /Online /Cleanup-Image /RestoreHealth /Source:WIM:D:\sources\install.wim:1 /LimitAccess
Disk-level checks
| Command | What it does | Note |
|---|---|---|
| chkdsk C: | Read-only report, no changes | Safe to run any time |
| chkdsk C: /f | Fixes file system errors | Schedules on reboot for the system drive |
| chkdsk C: /r | Locates bad sectors and recovers readable data | Implies /f. Can take many hours |
| chkdsk C: /scan | Online scan, NTFS only | Runs without taking the volume offline |
/r on a drive you suspect is failing. It forces a full surface read and can push a dying disk over the edge before anyone has taken an image. See the failing drive sheet below, and our data recovery service.Other repairs worth knowing
| Command | Use |
|---|---|
| DISM /Online /Cleanup-Image /StartComponentCleanup | Shrinks WinSxS after updates |
| DISM /Online /Cleanup-Image /AnalyzeComponentStore | Reports whether cleanup is recommended |
| sfc /scannow /offbootdir=C:\ /offwindir=C:\Windows | SFC from WinRE against an offline install |
| netsh winsock reset | Resets a broken Winsock catalogue — reboot after |
| wsreset.exe | Clears the Microsoft Store cache |
Windows boot repair & recoveryWindows
Getting into the Recovery Environment (WinRE)
- From Windows — hold Shift while clicking Restart.
- From the login screen — click the power icon, hold Shift, click Restart.
- From a dead machine — interrupt boot three times (power off during the Windows logo). The fourth boot enters WinRE automatically.
- From install media — boot the USB, then choose Repair your computer rather than Install.
Safe Mode
In WinRE: Troubleshoot > Advanced options > Startup Settings > Restart, then press 4 for Safe Mode, 5 for Safe Mode with Networking, 6 for Safe Mode with Command Prompt. From a working desktop you can also set it with:
bcdedit /set {default} safeboot minimal
bcdedit /deletevalue {default} safeboot — otherwise the machine boots to Safe Mode forever, which is a classic way to strand a remote user.Rebuilding the boot record
From a WinRE command prompt, in this order:
bootrec /fixmbr
bootrec /fixboot
bootrec /scanos
bootrec /rebuildbcd
If bootrec /fixboot returns Access is denied on a UEFI machine, rebuild the EFI partition instead. Use diskpart to find and assign a letter to the ~100MB EFI System Partition, then:
bcdboot C:\Windows /s S: /f UEFI
Startup Repair and rollback
- Startup Repair — WinRE > Troubleshoot > Advanced options. Worth one attempt; rarely worth three.
- Uninstall Updates — removes the latest quality or feature update. The fastest fix when a machine broke straight after Patch Tuesday.
- System Restore — only if restore points were enabled; they are off by default on many builds.
Blue screen stop codes — what they actually meanWindows
The on-screen name matters more than the hex code. These are the ones that come up in practice, with the first thing worth checking.
| Stop code | Usually means | Check first |
|---|---|---|
| CRITICAL_PROCESS_DIED | A required system process terminated | Run DISM then SFC; check for failed updates |
| MEMORY_MANAGEMENT | RAM or memory addressing fault | MemTest86 overnight; reseat DIMMs; test one stick at a time |
| IRQL_NOT_LESS_OR_EQUAL | A driver accessed invalid memory | Recently updated drivers — network and graphics first |
| DRIVER_IRQL_NOT_LESS_OR_EQUAL | As above, and the failing driver is named on screen | Note the .sys file shown and update or roll back that driver |
| PAGE_FAULT_IN_NONPAGED_AREA | Requested data wasn't in memory | RAM test, then disk health (SMART) |
| SYSTEM_SERVICE_EXCEPTION | Faulting driver or subsystem call | Graphics and audio drivers; third-party AV |
| KERNEL_SECURITY_CHECK_FAILURE | Data structure corruption detected | Driver mismatch after an upgrade; run chkdsk /f |
| INACCESSIBLE_BOOT_DEVICE | Windows can't reach the boot volume | Storage controller mode changed in BIOS (AHCI/RAID/VMD); failed update |
| UNEXPECTED_KERNEL_MODE_TRAP | CPU-level exception | Overclocking, thermals, failing CPU or board |
| VIDEO_TDR_FAILURE | GPU driver stopped responding and failed to reset | Clean-install the GPU driver; check temperatures |
| WHEA_UNCORRECTABLE_ERROR | Hardware error reported by the CPU | Genuine hardware fault — CPU, board, PSU or RAM |
| DPC_WATCHDOG_VIOLATION | A driver held the CPU too long | SSD firmware and storage drivers; old SATA drivers |
| BAD_SYSTEM_CONFIG_INFO | Registry or BCD problem | Boot repair; recent registry change |
Reading the dump
Minidumps land in C:\Windows\Minidump. Open with WinDbg or BlueScreenView from NirSoft — both are in the tools directory. The driver named in the dump is where to start, not the stop code.
Run box, shell and ms-settings commandsWindows
Press Win+R and type any of these. Faster than hunting through Settings, and they work when the Settings app itself is broken.
| Type this | Opens |
|---|---|
| ncpa.cpl | Network adapters — the fastest route to an IP config |
| appwiz.cpl | Programs and Features (classic uninstall list) |
| devmgmt.msc | Device Manager |
| diskmgmt.msc | Disk Management |
| services.msc | Services |
| eventvwr.msc | Event Viewer |
| taskschd.msc | Task Scheduler |
| gpedit.msc | Local Group Policy Editor (Pro and above) |
| secpol.msc | Local Security Policy |
| lusrmgr.msc | Local Users and Groups |
| certlm.msc | Certificates — local machine store |
| msconfig | System Configuration — boot and services |
| msinfo32 | System Information — model, BIOS, RAM slots |
| dxdiag | DirectX diagnostics — GPU and driver versions |
| perfmon /res | Resource Monitor |
| control printers | Devices and Printers |
| sysdm.cpl | System Properties — rename, domain join, environment variables |
| optionalfeatures | Turn Windows features on or off |
| shell:startup | Current user's Startup folder |
| shell:common startup | All-users Startup folder |
| shell:sendto | Send To menu contents |
| %temp% | Current user's temp folder |
| ms-settings:windowsupdate | Windows Update |
| ms-settings:network-status | Network status |
| ms-settings:about | About — edition, version, device specs |
| ms-settings:windowsdefender | Windows Security |
Keyboard shortcuts worth muscle memory
| Keys | Does |
|---|---|
| Win + X | Power user menu — Device Manager, Terminal (Admin), Disk Management |
| Ctrl + Shift + Esc | Task Manager directly |
| Win + Shift + S | Snip a region to the clipboard |
| Win + V | Clipboard history (enable it once) |
| Win + L | Lock the machine |
| Win + P | Projection mode — the fix for a blank second monitor |
| Win + Ctrl + Shift + B | Restart the graphics driver without rebooting |
| Win + . | Emoji and symbol picker |
| Ctrl + Shift + Enter | Run the highlighted Start search result as administrator |
Windows lifecycle & the ESU deadlineWindows
Windows 10 reached end of support on 14 October 2025. Extended Security Updates buy time — they do not extend the product lifecycle, and they deliver critical and important security fixes only, with no feature updates and no technical support.
| Version | Support ends | Notes |
|---|---|---|
| Windows 10 (all editions) | 14 Oct 2025 | Mainstream support ended |
| Windows 10 Consumer ESU | 12 Oct 2027 | Extended by Microsoft — you can still enrol at any point until then |
| Windows 10 Commercial ESU | Up to Oct 2028 | Three annual years; each year costs double the last |
| Windows 10 Enterprise LTSC 2021 | 13 Jan 2032 | Long-term servicing branch, unaffected by the above |
| Microsoft 365 apps on Windows 10 | Oct 2028 | Security updates for the Office apps continue past the OS cutoff |
Getting consumer ESU (free options exist)
- Device must be on Windows 10 version 22H2, fully updated, signed in with an administrator Microsoft account (not a child account).
- Free if you enable Windows Backup / PC settings sync, free for 1,000 Microsoft Rewards points, or a one-off $30 (local equivalent).
- One licence covers up to 10 devices. Enrol via Settings > Update & Security > Windows Update.
- Not available for domain-joined, Entra-joined, MDM-enrolled or kiosk devices — those need commercial ESU.
Verified against Microsoft's ESU page, August 2026. Widely republished articles still quote an October 2026 consumer end date; Microsoft has since extended it to October 2027.
Windows 11 — make it behave like Windows 10Windows
Restore the full right-click menu
Removes the "Show more options" second click. Run in a normal (non-admin) Command Prompt, then restart Explorer or reboot:
reg add "HKCU\Software\Classes\CLSID\{86ca1aa0-34aa-4e8b-a509-50c905bae2a2}\InprocServer32" /f /ve
To reverse it:
reg delete "HKCU\Software\Classes\CLSID\{86ca1aa0-34aa-4e8b-a509-50c905bae2a2}" /f
Show every system tray icon
Win+R, then paste:
explorer shell:::{05d7b0f4-2121-4eff-bf6b-ed3f69b894d9}
Other common requests
| Want | Where |
|---|---|
| Taskbar left-aligned | Settings > Personalisation > Taskbar > Taskbar behaviours > Taskbar alignment |
| Never combine taskbar buttons | Settings > Personalisation > Taskbar > Taskbar behaviours (returned in 23H2) |
| End Task on right-click | Settings > System > For developers > End Task |
| Restart Explorer without rebooting | Task Manager > Windows Explorer > Restart |
| Local account at setup | Disconnect the network before the sign-in step, or start setup with no internet |
BIOS & boot menu keys by manufacturerHardware
Tap the key repeatedly from the instant you press power — holding it down sometimes registers as a stuck-key error instead. On a modern UEFI machine with fast boot enabled the window can be under a second, which is why the software routes below are more reliable than the key.
The two routes that always work on Windows
- From a running machine: hold Shift and click Restart, then Troubleshoot > Advanced options > UEFI Firmware Settings.
- One command, from an elevated prompt — reboots straight into firmware, no key timing at all:
shutdown /r /fw /t 0
Both need UEFI rather than legacy BIOS, and the second needs administrator rights. On a machine that won't boot far enough for either, you're back to the keys.
Laptops & prebuilt desktops
| Manufacturer | BIOS / UEFI setup | Boot menu | Notes |
|---|---|---|---|
| Acer | F2 (some Del) | F12 | F12 boot menu is disabled by default on many Aspire models — enable it in setup first. Alt+F10 for eRecovery |
| Alienware | F2 | F12 | Dell firmware |
| Apple (Intel) | — | ⌥ Option | No BIOS. See the macOS startup keys sheet |
| Apple (Apple Silicon) | — | Hold Power | Shut down fully first, then hold power |
| ASUS (laptop) | F2 | Esc | Models beginning x or k often use F8 for the boot menu instead |
| Chromebook | — | — | No BIOS. Recovery is Esc + Refresh + Power; developer mode adds Ctrl+D |
| Compaq | F10 | Esc or F9 | Legacy Presario |
| Dell | F2 | F12 | Inspiron, XPS, Latitude, Precision, OptiPlex — consistent across the range |
| eMachines | Del or Tab | F12 | |
| Framework | F2 | F12 | |
| Fujitsu / Dynabook | F2 | F12 | |
| Gateway | F2 (older F1) | F11 or Esc | |
| HP | Esc then F10 | Esc then F9 | Tap Esc for the startup menu, then choose. Also F1 system info, F2 diagnostics, F11 recovery |
| Huawei / Honor | F2 | F12 | |
| IBM (legacy) | F1 | F12 | Pre-Lenovo ThinkPad and desktop |
| Lenovo ThinkPad | F1 | F12 | Very old models: Enter then F1 |
| Lenovo IdeaPad / Yoga | Novo button, or F2 | Novo button, or F12 | The Novo button is a pinhole or small arrow key beside the power button — press it with the machine off |
| Lenovo ThinkCentre / ThinkStation | F1 | F12 | |
| LG | F2 | F10 | |
| Medion | Del or F2 | F12 | |
| Microsoft Surface | Hold Volume Up + press Power | Hold Volume Down + press Power | Keep holding until the logo appears. No keyboard key works |
| MSI (laptop) | Del or F2 | F11 | |
| NEC | F2 | F5 | |
| Packard Bell | F2 | F12 | |
| Razer | Del or F1 | F12 | |
| Samsung | F2 | Esc | Disable Fast BIOS Mode first, or the window is too short to catch |
| Sharp | F2 | F12 | |
| Sony VAIO | F2 | F11 | Newer models: press the Assist button with the machine off |
| Toshiba | F2 | F12 | Some Satellite models: Esc then F1 |
| Xiaomi | F2 | F12 |
Swipe the table sideways on a small screen
Motherboards — self-built desktops
| Manufacturer | BIOS / UEFI setup | Boot menu |
|---|---|---|
| ASUS | Del or F2 | F8 |
| ASRock | F2 or Del | F11 |
| Biostar | Del | F9 |
| EVGA | Del | F7 |
| Gigabyte / Aorus | Del | F12 |
| Intel (NUC and boards) | F2 | F10 |
| MSI | Del | F11 |
| Shuttle | Del or Ctrl+Alt+Esc | F7 |
| Supermicro | Del | F11 |
| Zotac | Del | F8 |
| Generic / clone | Del, F1, F2 or Esc | F8, F11 or F12 |
Servers
| Vendor | Setup | Boot manager | Also |
|---|---|---|---|
| Dell PowerEdge | F2 — System Setup | F11 | F10 Lifecycle Controller, Ctrl+E for older iDRAC |
| HPE ProLiant | F9 — System Utilities | F11 | F10 Intelligent Provisioning, F8 array config |
| Lenovo ThinkSystem | F1 | F12 | |
| Supermicro | Del | F11 | IPMI is usually the faster route |
| Fujitsu Primergy | F2 | F12 |
Legacy BIOS vendors — very old kit
| BIOS | Key |
|---|---|
| AMI | Del |
| Award | Del or Ctrl+Alt+Esc |
| Phoenix | F2, or Ctrl+Alt+Esc / Ctrl+Alt+S |
| Micron / MPC | F1, F2 or Del |
shutdown /s /t 0 for a genuine full shutdown, or the shutdown /r /fw command above.Microsoft 365 & OneDrive
3 sheetsReset OneDriveMicrosoft 365
The standard fix when OneDrive is stuck on "Processing changes", shows the wrong account, or refuses to sign in. It does not delete files — it clears the client's state and re-reads the cloud. On a large library, re-indexing afterwards can take hours.
- Clear the Store cache first — Win+R, then
wsreset.exe. A console window opens, then the Store opens. Close it. - Win+R again and run the reset command for wherever OneDrive is installed. Try each in turn; the wrong path silently does nothing.
- Wait up to five minutes. OneDrive should relaunch on its own. If it doesn't, start it from the Start menu.
- Let it finish re-indexing before judging whether the fix worked.
%localappdata%\Microsoft\OneDrive\onedrive.exe /reset
"C:\Program Files\Microsoft OneDrive\onedrive.exe" /reset
"C:\Program Files (x86)\Microsoft OneDrive\onedrive.exe" /reset
If a reset doesn't fix it
- Unlink and relink — OneDrive settings > Account > Unlink this PC. Keeps local files.
- Run the Support and Recovery Assistant (SaRA) — Microsoft's own diagnostic, faster than guessing.
- Check the file isn't the problem — an invalid character, a 400-character path, or a locked file will stall the whole queue. See the limits sheet below.
- Error 0x8004de42 — you're behind an authenticated proxy. OneDrive does not support them.
OneDrive & SharePoint limitsMicrosoft 365
Most "mystery" sync failures are one of these limits, not a fault. Figures below are from Microsoft's restrictions and limitations page, checked August 2026.
Sizes and paths
| Limit | Value | Applies to |
|---|---|---|
| Individual file upload/download | 250 GB | Sync, individual files, and files inside a zip |
| Full decoded path + file name | 400 characters | OneDrive and SharePoint in Microsoft 365 |
| Any single name segment | 255 characters | One folder or file name, an OS limit |
| Sync root + relative path | 520 characters | e.g. C:\Users\jo\OneDrive - Contoso plus the rest |
| Windows File Explorer | 256 usable characters | The limit you hit first in daily use |
| SharePoint Server (on-prem) | 260 characters | Lower than SharePoint Online |
| Thumbnails / PDF previews | Not generated above 100 MB | File appears without a preview |
| OneNote notebook | 2 GB | Notebooks sync separately from OneDrive |
%20 in the browser bar is not what's being counted. It applies after the tenant domain, so sites/marketing/documents/… is what matters.Item counts
| Limit | Value |
|---|---|
| Recommended total synced items | 300,000 across all cloud storage — performance degrades beyond this even if not all are synced |
| New higher ceiling | 1,000,000 items per sync instance, in public preview for Windows 11 / Server 2022 (rolling out from April 2026). Needs 16 GB RAM minimum, an SSD, and an i5 / Ryzen 5 or better. No VDI support |
| Copy on the website | 2,500 files at a time |
| Sub-items in a shared folder | 50,000 |
| Unique permissions per list/library | 50,000 supported, 5,000 recommended |
| Accounts signed in per device | 1 personal + 9 work or school (macOS: one business account) |
Characters that block sync
The genuinely forbidden set is short — nine characters, plus leading and trailing spaces:
" * : < > ? / \ |
These are now supported on macOS (changed January 2025). Several others are conditionally a problem and are frequently listed as banned when they aren't:
#and%— fine unless your tenant predates the change and hasn't had support enabled.;— breaks saving via the Office desktop Backstage view to that folder.&— only a problem for Office 2010.
Names that are blocked outright
.lock, CON, PRN, AUX, NUL, COM0–COM9, LPT0–LPT9, _vti_ (anywhere in the name), desktop.ini, and anything starting ~$. forms is blocked at the root of a library only.
.tmp files never sync. If sync stalls at "Processing 0 KB", check the item count before anything else.Microsoft 365 admin URLsMicrosoft 365
Deep links straight to the console you actually want, instead of three clicks from the landing page.
| Console | URL |
|---|---|
| Microsoft 365 admin centre | admin.microsoft.com |
| Users | admin.microsoft.com/#/users |
| Shared mailboxes | admin.microsoft.com/#/SharedMailbox |
| Groups & Teams | admin.microsoft.com/#/groups |
| Domains | admin.microsoft.com/#/Domains |
| Service health | admin.microsoft.com/#/servicehealth |
| Exchange admin | admin.exchange.microsoft.com |
| Mailboxes | admin.exchange.microsoft.com/#/mailboxes |
| Entra ID (Azure AD) | entra.microsoft.com |
| Risky users | entra.microsoft.com/#view/Microsoft_AAD_IAM/RiskyUsers |
| Risky sign-ins | entra.microsoft.com/#view/Microsoft_AAD_IAM/RiskySignins |
| Defender / security | security.microsoft.com |
| Purview compliance | compliance.microsoft.com |
| Audit log search | compliance.microsoft.com/auditlogsearch |
| SharePoint admin | admin.microsoft.com/#/SharePoint |
| Teams admin | admin.teams.microsoft.com |
| Intune | intune.microsoft.com |
| Office app policies | config.office.com |
| Graph Explorer | developer.microsoft.com/graph/graph-explorer |
| Message trace | admin.exchange.microsoft.com/#/messagetrace |
First three places to look in a suspected account compromise
- Risky sign-ins in Entra — impossible travel, unfamiliar sign-in properties.
- Inbox rules on the mailbox — attackers almost always create a rule that files or deletes replies. Check via Exchange admin or
Get-InboxRule. - Audit log search in Purview — filter on the user, look for mail forwarding, app consent grants and MFA method changes.
Networking
7 sheetsNetwork troubleshooting commandsNetworking
The five-minute triage, in order
- Do I have an IP?
ipconfig /all— a 169.254.x.x address means DHCP failed entirely. - Can I reach the gateway?
ping 192.168.1.1— fails here and it's local: cable, switch port, VLAN. - Can I reach the internet by IP?
ping 1.1.1.1— works here but not by name, and it's DNS. - Can I resolve names?
nslookup itproexpert.com 1.1.1.1— compare against the local resolver. - Where does it break?
tracert 1.1.1.1or, better,pathpingfor loss per hop.
| Command | Use |
|---|---|
| ipconfig /all | Full adapter detail — MAC, DHCP server, DNS servers, lease |
| ipconfig /release && ipconfig /renew | Force a new DHCP lease |
| ipconfig /flushdns | Clear the resolver cache — first move after a DNS change |
| ipconfig /displaydns | Show what's cached, and its TTL |
| ping -t 1.1.1.1 | Continuous ping. Ctrl+C to stop, Ctrl+Break for running stats |
| pathping 1.1.1.1 | Traceroute plus per-hop packet loss. Slow but the most useful single test |
| tracert -d 1.1.1.1 | Traceroute without reverse-DNS lookups (much faster) |
| nslookup name 8.8.8.8 | Query a specific resolver — proves whether it's your DNS or the record |
| netstat -ano | All connections with owning PID — match against Task Manager |
| netstat -abno | As above with the executable name (needs admin) |
| arp -a | MAC-to-IP table — spot duplicate IPs and rogue devices |
| route print | Routing table — the answer when VPN traffic goes the wrong way |
| netsh wlan show wlanreport | Generates a full Wi-Fi connection history report as HTML |
| netsh int ip reset | Reset the TCP/IP stack (reboot after) |
| netsh winsock reset | Reset Winsock (reboot after) |
| Test-NetConnection host -Port 443 | PowerShell — the modern replacement for telnet port testing |
| Resolve-DnsName name -Type MX | PowerShell DNS lookup by record type |
| Get-NetTCPConnection -State Listen | PowerShell — what's actually listening |
Test-NetConnection host -Port 25 tells you whether a port is open without installing anything. Add -InformationLevel Detailed for the route and interface used.Port numbers worth knowingNetworking
| Port | Protocol | Service | Note |
|---|---|---|---|
| 20 / 21 | TCP | FTP data / control | Plaintext — use SFTP or FTPS |
| 22 | TCP | SSH, SFTP, SCP | Never expose with password auth |
| 23 | TCP | Telnet | Plaintext. Should not be in use |
| 25 | TCP | SMTP (server to server) | Blocked outbound by most UK ISPs |
| 53 | TCP/UDP | DNS | TCP used for large responses and zone transfers |
| 67 / 68 | UDP | DHCP server / client | |
| 80 | TCP | HTTP | |
| 88 | TCP/UDP | Kerberos | Active Directory authentication |
| 110 / 995 | TCP | POP3 / POP3S | |
| 123 | UDP | NTP | Time drift breaks Kerberos and MFA |
| 143 / 993 | TCP | IMAP / IMAPS | 993 is the one to use |
| 161 / 162 | UDP | SNMP / SNMP traps | Use v3; v1 and v2c are plaintext |
| 389 / 636 | TCP | LDAP / LDAPS | 636 for anything crossing a network |
| 443 | TCP | HTTPS | Also QUIC over UDP/443 |
| 445 | TCP | SMB | Never expose to the internet |
| 465 / 587 | TCP | SMTP submission | 587 with STARTTLS is standard; 465 implicit TLS |
| 514 | UDP | Syslog | |
| 1433 | TCP | Microsoft SQL Server | |
| 1723 | TCP | PPTP | Broken encryption — do not deploy |
| 3306 | TCP | MySQL / MariaDB | |
| 3389 | TCP | RDP | The single most attacked port. VPN or gateway only |
| 5060 / 5061 | TCP/UDP | SIP / SIP-TLS | VoIP signalling |
| 5432 | TCP | PostgreSQL | |
| 5900 | TCP | VNC | |
| 8006 | TCP | Proxmox web UI | |
| 8443 | TCP | UniFi / alt HTTPS | UniFi Network device comms on 8080 |
| 10000-20000 | UDP | RTP media | Range varies by PBX — the usual cause of one-way audio |
DNS record types & TTLNetworking
| Record | Points to | Typical use |
|---|---|---|
| A | IPv4 address | Root domain and hosts |
| AAAA | IPv6 address | The "quad A" record |
| CNAME | Another name | Aliases. Cannot coexist with other records at the same name, and cannot be used at the zone root |
| MX | Mail host + priority | Lower priority number wins |
| TXT | Free text | SPF, DKIM, DMARC, domain verification |
| SRV | Host + port + priority + weight | Autodiscover, SIP, Teams, LDAP |
| NS | Authoritative name servers | Set at the registrar and in the zone |
| SOA | Zone authority | Serial number, refresh, negative-cache TTL |
| PTR | Name from IP | Reverse DNS. Set by whoever owns the IP block — matters for mail |
| CAA | Permitted certificate authorities | Stops other CAs issuing for your domain |
| ALIAS / ANAME | Another name, flattened | Provider-specific way to get CNAME behaviour at the root |
TTL, in practice
- 3600 (1 hour) — a sensible default for stable records.
- 300 (5 minutes) — set this at least 24–48 hours before a planned migration, so caches have already picked up the short value.
- Lowering the TTL on the day of a cutover achieves nothing: resolvers are still holding the old, long TTL.
- Raise it back to 3600 once the change has settled.
Subnet mask & CIDR referenceNetworking
| CIDR | Subnet mask | Addresses | Usable hosts |
|---|---|---|---|
| /30 | 255.255.255.252 | 4 | 2 — point-to-point links |
| /29 | 255.255.255.248 | 8 | 6 |
| /28 | 255.255.255.240 | 16 | 14 |
| /27 | 255.255.255.224 | 32 | 30 |
| /26 | 255.255.255.192 | 64 | 62 |
| /25 | 255.255.255.128 | 128 | 126 |
| /24 | 255.255.255.0 | 256 | 254 — the standard office LAN |
| /23 | 255.255.254.0 | 512 | 510 |
| /22 | 255.255.252.0 | 1,024 | 1,022 |
| /21 | 255.255.248.0 | 2,048 | 2,046 |
| /20 | 255.255.240.0 | 4,096 | 4,094 |
| /16 | 255.255.0.0 | 65,536 | 65,534 |
| /8 | 255.0.0.0 | 16,777,216 | 16,777,214 |
Private ranges (RFC 1918)
10.0.0.0/8— 10.0.0.0 to 10.255.255.255172.16.0.0/12— 172.16.0.0 to 172.31.255.255 (not 172.0–172.255)192.168.0.0/16— 192.168.0.0 to 192.168.255.255169.254.0.0/16— APIPA. Seeing this means DHCP failed100.64.0.0/10— carrier-grade NAT. Your "public" IP isn't public
Quick mental maths
Usable hosts = 2(32 − prefix) − 2. The minus two is the network address and the broadcast address. A /31 is the exception — it is valid for point-to-point links with no waste.
Ethernet cable categories & PoE standardsNetworking
| Category | Speed | Distance | Bandwidth |
|---|---|---|---|
| Cat5e | 1 Gbps (2.5 Gbps often works) | 100 m | 100 MHz |
| Cat6 | 1 Gbps to 100 m; 10 Gbps to 55 m | 100 m / 55 m | 250 MHz |
| Cat6a | 10 Gbps | 100 m | 500 MHz |
| Cat7 / Cat7a | 10 Gbps | 100 m | 600 / 1000 MHz — non-standard connectors, rarely worth it |
| Cat8 | 25–40 Gbps | 30 m | 2000 MHz — data centre top-of-rack only |
Power over Ethernet
| Standard | Name | Switch supplies | Device receives | Typical loads |
|---|---|---|---|---|
| 802.3af | PoE (Type 1) | 15.4 W | 12.95 W | VoIP phones, basic APs, small cameras |
| 802.3at | PoE+ (Type 2) | 30 W | 25.5 W | Wi-Fi 6 APs, PTZ cameras |
| 802.3bt | PoE++ (Type 3) | 60 W | 51 W | Wi-Fi 6E/7 APs, video bars, thin clients |
| 802.3bt | PoE++ (Type 4) | 100 W | 71 W | Displays, laptops, high-power devices |
| Passive PoE | Non-standard | Varies (24 V / 48 V) | — | No negotiation. Wrong pairing destroys equipment |
T568B colour code — pin by pin
Use T568B. It is the predominant standard on commercial installs, it is what almost every factory-made patch lead uses, and it is what the colour print on most keystone modules lists first. T568A is equally valid and identical in performance — the two differ only by swapping the orange and green pairs — but mixing them on one cable makes an accidental crossover.
| Pin | Wire | Pair | 10/100 | Gigabit and above |
|---|---|---|---|---|
| 1 | White/orange | 2 | Transmit + | BI_DA+ |
| 2 | Orange | 2 | Transmit − | BI_DA− |
| 3 | White/green | 3 | Receive + | BI_DB+ |
| 4 | Blue | 1 | Unused · PoE mode B | BI_DC+ |
| 5 | White/blue | 1 | Unused · PoE mode B | BI_DC− |
| 6 | Green | 3 | Receive − | BI_DB− |
| 7 | White/brown | 4 | Unused · PoE mode B | BI_DD+ |
| 8 | Brown | 4 | Unused · PoE mode B | BI_DD− |
Order, 1 to 8: white/orange, orange, white/green, blue, white/blue, green, white/brown, brown
Getting it right at the connector
- Orientation. Hold the plug with the clip facing away from you and the gold contacts towards you — pin 1 is on the left. Look at the plug the other way and you'll wire it backwards.
- Both ends must match. B at both ends is a straight-through cable. A at one end and B at the other is a crossover — modern gear auto-senses around it, but it fails certification and creates a fault nobody can find later.
- Untwist no more than 13 mm (½ inch) at the termination. Excessive untwisting is the leading cause of NEXT failures on otherwise good cable.
- Trim the spline flush with the jacket if the cable has one, keep the jacket inside the strain relief, and check all eight conductors are seated to the front of the plug before crimping.
- Keystone modules are printed with both codes. Punch down to the B row and ignore the A row entirely — mixing the two on one module is the usual cause of a "wired but dead" outlet.
Which pairs actually do the work
- 10/100 Mbps uses only pins 1, 2, 3 and 6 — the orange and green pairs.
- Gigabit and above (1000BASE-T, 2.5G, 5G, 10G) uses all four pairs, bidirectionally, on the same pinout. This is why a damaged blue or brown pair produces the classic symptom: the link works but never exceeds 100 Mbps. At 100 Mbps those pins were never used, so the fault was invisible.
- PoE mode A puts power on the data pairs (1–2 and 3–6). Mode B uses the spare pairs (4–5 and 7–8). The switch decides which, not the device. 802.3bt uses all four pairs, so there are no spare pairs left to sacrifice.
Wi-Fi channels, bands & standardsNetworking
| Marketing name | Standard | Bands | Notes |
|---|---|---|---|
| Wi-Fi 4 | 802.11n | 2.4 / 5 GHz | Legacy. One 11n client can drag a whole SSID down |
| Wi-Fi 5 | 802.11ac | 5 GHz only | Still fine for most offices |
| Wi-Fi 6 | 802.11ax | 2.4 / 5 GHz | OFDMA — the real gain is in density, not headline speed |
| Wi-Fi 6E | 802.11ax | + 6 GHz | Clean spectrum, shorter range, needs WPA3 |
| Wi-Fi 7 | 802.11be | 2.4 / 5 / 6 GHz | 320 MHz channels, Multi-Link Operation |
2.4 GHz — only three channels exist
Use 1, 6 and 11 only. Every other channel overlaps two of them. A site using channels 3 and 9 "to avoid congestion" is actively making it worse for everyone including itself. Stay on 20 MHz width — 40 MHz on 2.4 GHz is self-defeating.
5 GHz in the UK
- Channels 36–48 (U-NII-1) — indoor, no DFS. The safe default.
- Channels 52–64 and 100–140 — DFS. More spectrum, but a radar detection event silently boots every client off the channel. Avoid DFS for anything carrying voice.
- Channels 149–165 (U-NII-3) — higher power, allowed in the UK, good for outdoor and point-to-point.
- Use 40 MHz width in offices, 80 MHz only where the airtime is genuinely clear. Wider channels mean fewer non-overlapping options.
6 GHz
The UK permits 5925–6425 MHz — the lower 500 MHz, indoor low-power use. That's roughly 24 × 20 MHz channels, or three 160 MHz channels. The US has the full 1200 MHz, so US channel plans and reviews do not transfer. WPA3 is mandatory on 6 GHz; there is no WPA2 fallback.
Find a saved Wi-Fi passwordNetworking
Five routes, depending on what's in front of you. All require administrative or owner access to the device — this recovers a key the machine already holds, it does not break into a network.
Windows 11
Since build 23466 the key is visible in the GUI: Settings > Network & internet > Wi-Fi > Manage known networks, select the SSID, then View Wi-Fi security key.
Windows 10
Control Panel > Network and Internet > Network and Sharing Center. Click the Wi-Fi name next to Connections, then Wireless Properties > Security > Show characters. Only shows the network you're currently connected to.
Any Windows — command line, including networks you're not on
netsh wlan show profiles
netsh wlan show profile "SSID-NAME" key=clear
The key appears as Key Content. To dump every saved network at once:
netsh wlan show profiles | Select-String ":\s(.+)$" | ForEach-Object { netsh wlan show profile name="$($_.Matches.Groups[1].Value.Trim())" key=clear }
macOS
Open Keychain Access (or Passwords in System Settings on Sonoma and later), select System under System Keychains, click Passwords, double-click the network, tick Show password and authenticate. Terminal equivalent:
security find-generic-password -ga "SSID-NAME" | grep password
Chromebook
Select the time > Settings (or Alt+Shift+S) > Network > your Wi-Fi > Network Details. On managed devices the key is often hidden by policy; chrome://net-export plus a netlog parser is the usual workaround, and needs the device owner's consent.
Security & compliance
5 sheetsSPF, DKIM & DMARC — records that actually workSecurity
Google and Yahoo made authentication mandatory for bulk senders in February 2024; Microsoft followed in May 2025 with full rejection from November 2025. "Bulk" means roughly 5,000+ messages a day to that provider's consumer inboxes — but unauthenticated mail from small senders is filtered harder too, so this applies to everyone.
SPF — one record, ten lookups
v=spf1 include:spf.protection.outlook.com include:_spf.google.com ~all
- Exactly one SPF record per domain. Two records is a permanent fail, and it's the single most common mistake.
- Ten DNS lookup limit, counting every nested
include:. Exceed it and SPF returns permerror — which DMARC treats as a fail. ~all(softfail) while testing,-all(hardfail) once you're certain every sender is listed.- Never use
+all. It authorises the entire internet to send as you.
DKIM
- Published as a TXT record at
selector._domainkey.yourdomain.com. - Minimum 1024-bit key — Yahoo rejects 512-bit outright. 2048-bit is the sensible default.
- The signing domain (
d=) must align with the visible From domain for DMARC to pass on DKIM. - Rotate selectors periodically; keep the old selector published until the last signed mail has aged out.
DMARC
v=DMARC1; p=none; rua=mailto:dmarc@yourdomain.com; fo=1; pct=100
| Tag | Means |
|---|---|
| p= | none monitor · quarantine to spam · reject bounce at SMTP |
| rua= | Where aggregate XML reports go. Without this you are flying blind |
| pct= | Percentage of mail the policy applies to — ramp 25 → 50 → 100 |
| sp= | Policy for subdomains. Set sp=reject even at p=none to stop subdomain spoofing |
| adkim= / aspf= | r relaxed (default) or s strict alignment |
The rollout that doesn't break your mail
- Publish
p=nonewithrua=and leave it for 2–4 weeks. - Read the reports. Find every legitimate sender — CRM, invoicing, marketing, the scanner in the corner that emails PDFs.
- Authenticate each one via SPF include or DKIM signing.
- Move to
p=quarantinewithpct=25, then 100. - Then
p=reject. Staying atp=noneindefinitely is now read as a negative trust signal.
| Provider | Rejection code you'll see |
|---|---|
| 550 5.7.26 | |
| Yahoo | 550 5.7.9 |
| Microsoft | 550 5.7.515 |
List-Unsubscribe-Post, not just a footer link), a valid PTR record, TLS on delivery, and a spam complaint rate below 0.3% — aim under 0.1%. DMARCbis was published as RFC 9989–9991 in May 2026, raising DMARC to a Proposed Standard.Password & MFA policy that matches current guidanceSecurity
NIST finalised SP 800-63B revision 4 in 2025, and it reverses most of what corporate policy still says. If your password policy enforces complexity and 90-day expiry, it is now actively contrary to the standard.
| Rule | Current guidance | What most policies still do |
|---|---|---|
| Minimum length | 8 minimum; 15 required where the password is the only factor | 8 with complexity |
| Maximum length | Accept at least 64 characters | Cap at 16 — breaks password managers |
| Complexity rules | Do not impose them. No forced upper/lower/digit/symbol | Mandatory character classes |
| Expiry | No routine rotation. Change only on evidence of compromise | Every 60–90 days |
| Blocklist | Screen against known-breached and common passwords | Rarely done |
| Characters | Allow all printable ASCII, Unicode and spaces | Symbols banned "for compatibility" |
| Paste | Must be permitted, to support password managers | Blocked on the login field |
| Hints / security questions | Prohibited | Still in use for self-service reset |
MFA, strongest first
- Passkeys / FIDO2 hardware keys — phishing-resistant. The only tier that survives a convincing fake login page.
- Push with number matching — resists MFA fatigue attacks. Plain approve/deny push does not.
- TOTP authenticator app — fine, but phishable in real time by an attacker-in-the-middle proxy.
- SMS and voice — last resort. Vulnerable to SIM swap and interception.
Practical policy for a UK SME
- 15+ character passphrases, no expiry, breach screening at set and change.
- Passkeys for anyone who will take them; number-matched push for everyone else.
- Password manager deployed and paid for — the policy above is unworkable without one.
- Separate, unlicensed break-glass admin accounts, excluded from conditional access, credentials sealed and physically stored.
Cyber Essentials — the five controls & what changed in 2026Security
The UK government-backed baseline, run by IASME for the NCSC. Two tiers: Cyber Essentials (verified self-assessment) and Cyber Essentials Plus (hands-on technical audit of the same controls).
| Control | What it means in practice |
|---|---|
| Firewalls | Boundary and host firewalls configured and documented; no unnecessary inbound services; admin interfaces not exposed to the internet |
| Secure configuration | Default passwords changed, unused accounts and software removed, auto-run disabled, device locking enforced |
| User access control | Least privilege, separate admin accounts, prompt leaver removal, and MFA — now with heavy emphasis on passwordless and passkeys |
| Security update management | Supported software only; high and critical patches applied within 14 days |
| Malware protection | Anti-malware, or allow-listing, on every in-scope device |
Version 3.3 "Danzell" — live from 27 April 2026
It replaced v3.2 "Willow". The five controls are unchanged; the marking tightened significantly. Under Willow you could carry up to two major non-compliances and still pass. That margin has gone for the critical items.
- Auto-fail: MFA missing on any cloud service where MFA is available.
- Auto-fail: high and critical patches not applied within 14 days.
- Cloud services are defined and explicitly in scope for the first time.
- Scoping tightened — all specified internet-connected devices are in scope; partial scope still allowed but you must justify exclusions to the assessor.
- Updates also to backups, certification transparency and application development questions.
We cover the process in more depth in our Cyber Essentials guide, and can prepare and certify you through our cyber security service.
Ransomware — the first hourSecurity
Decisions made in the first hour determine whether this is an incident or a catastrophe. Print this and keep a paper copy — if it only exists on the file server, you won't have it when you need it.
Do immediately
- Isolate, don't power off. Pull the network cable or disable Wi-Fi. Powering off destroys memory-resident evidence and can destroy encryption keys still in RAM.
- Disconnect backups and NAS. Anything reachable from an infected host is a target — that is precisely how attackers make recovery impossible.
- Identify scope. Which machines, which shares, which accounts. Check for the same file extension appearing across servers.
- Disable compromised accounts and revoke sessions — a password reset alone leaves stolen tokens valid.
- Preserve evidence. Photograph the ransom note, keep a sample encrypted file and the note itself, record timestamps.
- Start a written timeline. Who did what, when. Insurers and the ICO will both ask.
Capture the RAM first — the free lottery ticket
Encryption keys have to exist in memory while files are being encrypted. Capturing RAM before the machine is rebooted or powered off preserves the only copy that will ever be in your hands. It takes five minutes, costs nothing, and occasionally recovers everything. Do it straight after isolating the machine, before any other troubleshooting.
Method 1 — Task Manager, no downloads needed
The single best target is the ransomware process itself, and Windows can dump it with no tools at all. Use this if the machine is still actively encrypting.
- Open Task Manager with
Ctrl + Shift + Escand switch to the Details tab. - Sort by CPU. The ransomware is usually the process burning CPU with an unfamiliar name — note it, but do not end it.
- Right-click it > Create dump file. Windows writes a
.DMPto your temp folder and shows you the path. - Copy that file to the USB stick immediately, then repeat for anything else suspicious.
Method 2 — full system RAM capture
More thorough, and the one to use if the process has already exited or you can't identify it. Both tools are free, portable, and need no installation — put one on a USB stick now, before you need it. Both are listed in our tools directory.
| Tool | How | Notes |
|---|---|---|
| Magnet RAM Capture | Run the single .exe as administrator, choose the USB stick as the destination, click Start | Free from Magnet Forensics. Deliberately tiny memory footprint, so it overwrites as little evidence as possible. Outputs .raw / .dmp / .bin |
| FTK Imager | File > Capture Memory, set the destination to the USB stick, tick Include pagefile, click Capture | Free from Exterro. Takes 30–90 seconds. Also grabs pagefile.sys, which can hold key material swapped out of RAM. Outputs .mem |
Finish the capture properly
- Name the file so it identifies itself — hostname, date and time, e.g.
ACC-PC04_2026-08-01_1420.raw. - Hash it so nobody can question it later. From a clean machine:
Get-FileHash E:\ACC-PC04_2026-08-01_1420.raw -Algorithm SHA256 - Write down who took it, when, and from which machine. Add it to the incident timeline.
- Keep the stick out of the infected network and hand it to whoever runs the investigation — your insurer's responder, or us.
Do not
- Do not reboot or run "cleanup" tools before the scope is understood. Some strains encrypt further on restart.
- Do not restore straight away. Restoring into a network the attacker still holds simply re-encrypts your only clean copy.
- Do not pay before advice. Payment may be a criminal offence depending on the sanction status of the group, funds rarely produce a working decryptor, and it marks you as payable.
- Do not tell everyone on the compromised email system. Assume the attacker is reading it. Move to phones or a separate channel.
UK reporting clocks
| Who | When | Notes |
|---|---|---|
| ICO | Within 72 hours of becoming aware | Required if personal data is likely at risk. Report even if the picture is incomplete |
| Cyber insurer | Immediately | Most policies require notification before you engage anyone — using your own responder first can void cover |
| Action Fraud / NCSC | As soon as practical | Action Fraud for the crime report; NCSC for significant incidents |
| Affected individuals | Without undue delay | Where there is high risk to their rights and freedoms |
Phishing — red flags & header checksSecurity
What actually gives it away
- Display name matches, address doesn't. Check the real address, not the friendly name. On mobile this takes a deliberate tap — which is why mobile users click more.
- Reply-To differs from From. The classic invoice-fraud signature.
- Lookalike domain —
rnform,.cofor.co.uk, an added hyphen, or a legitimate-looking subdomain likemicrosoft.login-verify.com. Read domains right to left: the bit before the final slash is what counts. - Urgency plus secrecy. "Before end of day", "don't discuss this with the team" — the two together are close to diagnostic.
- A payment detail change. Any bank detail change arriving by email is fraud until verified by phone on a number you already had.
- Unexpected MFA prompt. Means someone already has the password. Deny, then change it.
- QR codes in email — increasingly used because the link never appears in text for filters to scan.
Reading the headers
In Outlook: open the message, File > Properties > Internet headers. In the new Outlook and OWA: … > View > View message details. In Gmail: ⋮ > Show original. What to look for:
| Header | What it tells you |
|---|---|
| Authentication-Results | The verdict line — spf=pass dkim=pass dmarc=pass. A DMARC fail on a domain that should be authenticated is decisive |
| Return-Path | The real envelope sender. Frequently nothing like the From address |
| Received | Read bottom to top — the bottom entry is the origin |
| Reply-To | Where a reply actually goes |
| X-Forefront-Antispam-Report | Microsoft's scoring — SCL spam confidence, BCL bulk confidence |
| Message-ID | Domain should match the sending infrastructure; mismatches are a tell |
If someone has already clicked
- Change the password from a different device, then revoke all sessions.
- Re-register MFA methods — attackers add their own authenticator immediately.
- Check mailbox rules and forwarding, in the mailbox and at tenant level.
- Check for new OAuth app consents granted by that user.
- Run a Purview audit search for that account over the past 30 days.
- Warn finance directly, by phone, if the account has any payment authority.
Hardware & data
4 sheetsFailing drive — what to do in the first ten minutesData
Almost every unrecoverable case we see was recoverable when it started. The damage is usually done by well-meaning troubleshooting, not by the original fault.
Stop immediately
- Power the machine down and leave it down. Every additional minute of spinning on a failing head assembly grinds the platters.
- Do not run chkdsk, defrag, or recovery software. Recovery software is for deleted files on a healthy disk. On a failing disk it hammers the drive and can turn a head problem into unrecoverable platter damage.
- Do not open the drive. One second of exposure lets in dust that makes cleanroom recovery far harder or impossible.
- Do not swap the PCB from a "matching" donor. Without transferring the ROM chip, the new board writes the wrong adaptives and can render the drive unrecoverable.
- Do not freeze it. Condensation on the platters.
SSD and NVMe are different — and more urgent
Sounds and what they mean
| Sound | Likely cause | Recovery difficulty |
|---|---|---|
| Rhythmic clicking | Read/write head failure — the actuator resets repeatedly | High — cleanroom head swap from a matched donor |
| Grinding or scraping | Head crash; heads contacting the platters | Extreme — data may already be destroyed |
| Buzzing or loud whirring | Spindle motor seizing | High — platter transfer to a donor chassis |
| Faint beeping or chirping | Heads stuck to the platter (stiction), or motor can't spin up | Moderate to high — often good outcomes if caught early |
| Silence, no spin-up | PCB or electronics failure | Moderate — donor board plus ROM transfer |
Full detail, guide prices and turnaround on our data recovery page. There is usually only one good attempt at a recovery — spend it on the right equipment.
RAID levels & the 3-2-1-1-0 backup ruleData
| Level | Min disks | Usable capacity | Survives | Use for |
|---|---|---|---|---|
| RAID 0 | 2 | 100% | Nothing | Scratch space only. One disk dies, everything is gone |
| RAID 1 | 2 | 50% | 1 disk | Boot volumes, small servers |
| RAID 5 | 3 | n−1 | 1 disk | Increasingly discouraged on large drives — see below |
| RAID 6 | 4 | n−2 | 2 disks | The sane default for large arrays |
| RAID 10 | 4 | 50% | 1 per mirror set | Databases and anything write-heavy |
| RAID 50 / 60 | 6 / 8 | Varies | 1 / 2 per span | Large arrays needing throughput |
3-2-1-1-0
| Digit | Means | In practice |
|---|---|---|
| 3 | copies of the data | Production plus two backups |
| 2 | different media types | Not two folders on the same NAS |
| 1 | copy off-site | Cloud or a rotated drive that leaves the building |
| 1 | copy immutable or air-gapped | Object-lock storage or offline media. This is the one that survives ransomware |
| 0 | errors after a verified restore test | An untested backup is not a backup |
Define RTO (how long you can be down) and RPO (how much data you can lose) per system rather than applying one policy to everything, and test a full restore on a schedule — including the restore of the thing nobody has ever restored.
macOS startup keys — Apple Silicon vs IntelmacOS
| Goal | Apple Silicon (M1 and later) | Intel |
|---|---|---|
| Recovery | Hold power → Options → Continue | ⌘ + R |
| Internet Recovery (latest compatible macOS) | Built in to the above | ⌥ + ⌘ + R |
| Internet Recovery (original macOS) | Not applicable | ⇧ + ⌥ + ⌘ + R |
| Choose a startup disk | Hold power → pick the volume | ⌥ (Option) |
| Safe Mode | Hold power → select disk → hold ⇧ → "Continue in Safe Mode" | ⇧ (Shift) |
| Apple Diagnostics | Hold power → then press ⌘ + D | D |
| Share the disk to another Mac | Recovery → Utilities → Share Disk | T |
| Reset NVRAM / PRAM | Not needed — done automatically | ⌥ + ⌘ + P + R |
| Reset SMC | Not applicable | Varies by model; T2 Macs differ |
| Reset a forgotten password | Recovery → Utilities → Terminal → resetpassword | |
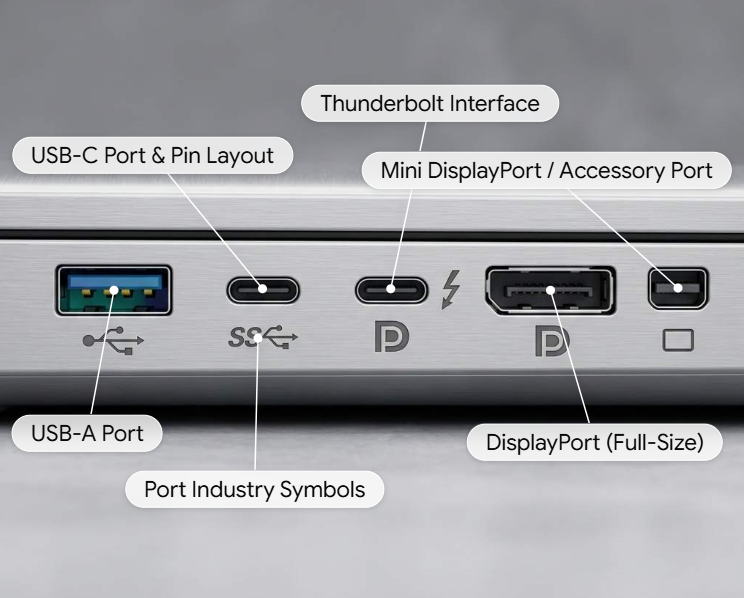
Identifying ports, connectors & cablesHardware
USB-C is a connector shape, not a capability. Two identical-looking ports on the same laptop can differ by a factor of forty in bandwidth, and one may not carry video at all.
| Marking | Actually is | Speed | Video? |
|---|---|---|---|
| USB-C, no logo | USB 2.0 in a C shape — common on cheap laptops and chargers | 480 Mbps | No |
| USB-C with SS or 5/10 | USB 3.2 Gen 1 / Gen 2 | 5 or 10 Gbps | Only if DisplayPort Alt Mode is supported |
| USB-C with a lightning bolt | Thunderbolt 3 / 4 / USB4 | 40 Gbps | Yes, usually two displays |
| USB-C with a "D" or DP logo | DisplayPort Alt Mode | Varies | Yes |
| USB-A blue insert | USB 3.0 / 3.1 Gen 1 | 5 Gbps | No |
| USB-A with SS10 / teal | USB 3.1 Gen 2 | 10 Gbps | No |
| USB-A yellow / with a battery icon | Always-on charging port | Varies | No |
| Mini DisplayPort | Often Thunderbolt 1/2 on older Macs | — | Yes |
About these sheets
Verified August 2026Everything here is checked against vendor documentation rather than copied from other cheat sheets, and dated so you can tell how current it is. Where guidance has changed recently we say so explicitly — the Windows 10 ESU end date, the OneDrive path limit and the NIST password rules have all moved in the last eighteen months, and out-of-date versions of all three are still widely republished.
Primary sources: Microsoft Learn and Microsoft Support, NIST SP 800-63B revision 4, IASME and the NCSC for Cyber Essentials, Apple Support for macOS startup, and the IEEE standards for Ethernet and PoE. If you spot something that has moved on, tell us and we'll correct it.
Stuck on something that isn't here?
Contact us for any additional services not listed on this page, or any queries we can help with. Sales lines are open 9:30 to 5:30, and critical support services are available 24/7.